

If you’re looking for a reliable and efficient screen recorder for your Windows 11 PC, look no further than iTop Screen Recorder. This powerful software offers a range of features and benefits that make it the ultimate tool for recording your screen. In this article, we will explore the benefits of iTop Screen Recorder and how you can use it to record your Windows 11 screen with ease.
Why Choose iTop Screen Recorder for Your Windows 11 PC?
iTop Screen Recorder is one of the most popular screen recording software on the market, and for good reason. It provides users with the ability to record high-quality videos with resolutions up to 4K, making it ideal for capturing even the most intricate details on your screen. The software offers adjustable frame rates and bitrates, which means you can customize your recording settings to suit your needs.
iTop Screen Recorder is easy to use and comes with a range of customizable recording options. It allows you to record your PC screen and audio simultaneously, making it ideal for recording tutorials, gaming sessions, and other content. The software also comes with a built-in video editor that allows you to edit your recordings with ease.
How to Record Your Windows 11 Screen with iTop Screen Recorder?
Recording your Windows 11 screen with iTop Screen Recorder is a simple and straightforward process. Follow the steps below to get started:
Step 1: Download and Install iTop Screen Recorder
Visit the official iTop Screen Recorder website at https://it.itopvpn.com/ and download the software. Once the download is complete, run the installation file and follow the on-screen instructions to install the software on your Windows 11 PC.
Step 2: Configure Recording Settings
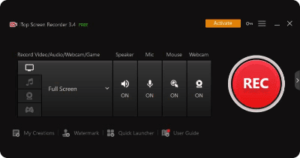
Launch iTop Screen Recorder and select the “Screen” option. Choose the area of your screen you want to record. You can also choose to record audio, enable or disable the webcam recording option, and set the frame rate and bitrate for your recording.
Step 3: Start Recording
Once you have configured your recording settings, click on the “REC” button to start recording. iTop Screen Recorder will start recording your Windows 11 screen. You can pause or stop the recording at any time by clicking on the appropriate buttons.
Step 4: Edit and Save your Recording
After you have finished recording, iTop Screen Recorder will automatically open the built-in video editor. You can use the editor to trim, cut, add text, and apply effects to your recording. Once you are satisfied with your recording, save it to your preferred file format and location.
Conclusion
iTop Screen Recorder is the ultimate tool for recording your Windows 11 screen. With its high-quality recording capabilities, user-friendly interface, and built-in video editor, it’s the perfect tool for capturing your screen activity accurately and efficiently. To get started with iTop Screen Recorder, visit the official website at https://it.itopvpn.com/ and download the software today. You won’t be disappointed!